Just a post to say I have set up a new blog as a dressmaking portfolio, over at emilybeardall.com, so please take a look! I also have a new Facebook page at Facebook.com/EmilyBeardallSewing. I’ll still be using The Crochet Kid for crochet and other crafts, so have a look round while you’re here!
My niece has got really into wearing hats from her dressing up box. Up until now she wouldn’t keep one of hers on for more than a few seconds – not good in the winter time! My sister asked me to make an owl hat, one with plaits. After looking around at crochet patterns I […]
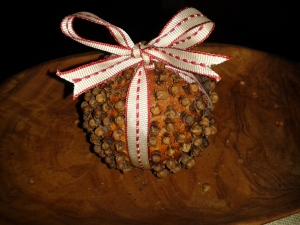
Time to get making these so they’re dried in time for Christmas! All you need is an orange, cloves and some ribbon (optional).
I have fond memories of sitting making pomanders with my mum when I was little, while sitting in front of an open fire on dark winter afternoons, possibly with Woman’s Hour or a play on the radio. Medieval herbalists used pomanders – mixtures of fragrant, dried herbs in cloth bags or perforated boxes – to ward off illness or bring strength and good fortune.
Here’s a photo tutorial for how to make your own pomander. It’s my first craft tutorial, so I hope you find it easy enough to follow! Once you’ve made a basic one, get creative and come up with your own designs, like these I found while browsing:
Step 1: Gather your stuff!
All you need is an orange, a couple of handfuls of cloves and 80cm of ribbon (optional).
It will be much more economical if you’re making several pomanders to buy cloves in a large quantity from an Asian supermarket or online, rather than the little glass jar of them from the supermarket or your spice rack.
It is easier if the ribbon is about 1cm wide. I already have some Christmas ribbons, though you could use any colour and velvet ribbon suits them traditionally.
Step 2: Wrap ribbon around the orange (optional)
I did this the way ribbon is used around wrapped presents, with a continuous piece of ribbon and finishing in a bow on top. If you have difficulty keeping the ribbon in place, secure it by putting pins through the ribbon into the orange. If you prefer, you could tie the ribbon round the orange after it has dried and shrunk slightly, marking out the place where the ribbon would go with masking tape or selotape like this:
I found I needed to re-tie the ribbon round again because it became loose after the orange shrunk, so here’s a little vid I made of how to tie the ribbon:
Step 3: Push the cloves in
Push the cloves in, being careful not to crush the top of them off in the process. I wasted quite a few cloves by doing this and found the best way was to only grip the four hard claws around the top. If you’re finding the orange pith too difficult to push the clothes into, find something that will pierce it for you, such as a cocktail stick or an old ball point pen, making pilot holes where you want to push in the cloves.
Step 4: Dry the pomander
The pomander takes up to four weeks to dry in a warm, dry place. The orange will be brown, hollow and lighter in weight. It can then be hung in a doorway, as is tradition, or hung on a Christmas tree.
The drying process can be shortened by laying the pomander on a radiator, which will fill your room with that lovely Christmassy fragrance, or by putting it in a microwave on full power for one minute, once a week.
I’ll post up a photo of the fully dried pomander in a few weeks!
I decided to do some patchwork by machine for the first time and make a play mat for my new niece, Millie. I chose 4 fabrics that went well together, along with some crochet trim. I really enjoyed making it and I’m pleased with how it turned out. I’ll definitely be doing some more of this. Commissions welcome!
I decided that having made a few items for my niece, that I’d like to make a dress for her mum!
The pattern is the shift dress from the Sewing Bee Series 2 book. My sister lives too far away now to have a fitting session, so I made a mock-up from an old bed sheet and sent it to her by post to try on. We Skyped so I could see how the dress fitted and decided where any alterations would need to be made.
The dress in the book isn’t lined but we decided it really needed to be, so that it would be comfortable to be worn all day at work. I lined the dress using the magic pull-through-the-shoulders method shown in this really clear and easy YouTube FashionSewingBlogTV tutorial by Colleen at Fashion Sewing Blog. The site has lots of videos on sewing techniques, even if it’s just an adjustment to a bought garment that you need to do, and it makes a refreshing change from the all the American tutorials to watch British ones!
I also had a lot of help and advice from mum, who had used the pattern before, so thanks Mum!
More pics can be seen at my dressmaking portfolio blog at emilybeardall.com